Installation Info
Aluminum Lacework
Central Foundry DO NOT install and we do not fabricate or weld into solid frames.
Orders are usually supplied as individual panels to be assembled onsite.
Orders are supplied with panels already cut to size and powdercoated if required. 20mm is deducted from customer TIGHT measurement, which leaves a 10mm gap at each end. Therefore it is important to get all measurements correct before placing your order.
For the past 20 years, Central Foundry has been supplying an extruded aluminium handrail system for self-installation by a qualified builder, carpenter or home handyman. Our handrail system achieves the 1-metre height requirement and is usually fastened together with self-tapping screws. (see RAIL SETUP)
It is the responsibility of the installer to provide accurate measurements and ensure the balustrade is installed securely.
Over the years we have found installation to go much smoother if the installer picks up the completed order from our factory and takes time to see our demo set up in the showroom.
Please note that a brace (or two) is usually needed to increase strength and minimise lateral movement and flex in the handrail. These braces were almost always used on the original cast iron balustrades as well. Here’s a picture of supports.
Install Recommendations (of Central Foundry products, rail system and panels)
Garry from Paddington Lace specializes in terrace house facade restorations and can provide a complete supply and install service.
Mobile - 0466535232
Email - paddingtonlace@gmail.com
Website - https://paddingtonlace.com.au

Fabrication And Installation
Alternatively, you could source a local fabricator who can measure up and quote you directly. We would recommend Bruno from Ace Ironmasters who purchases the product from us and then fabricates them to your requirements. Bruno will also organise the painting and installation. He can be contacted on
Mobile - 0405080258
Email - brunoaneiva@hotmail.com
Bruno’s website is https://aceironmasters.com.au
Installation Guide And Recommendations
Please note that Central Foundry staff have NEVER installed lace balustrades. The following information has been compiled from feedback by customers and subcontracted installers over the years.
To ensure your balustrade is installed correctly we recommend you use a licensed builder, carpenter, balustrade specialist or handyman with relevant experience. Central Foundry can only provide limited building advice however we are happy to recommend installers with many years experience in this field. The following steps have been compiled over the past few years however do note that this a guide only.
Pre drill panel feet to required sizes (usually 8G self drilling stainless steel screw)
Trim down railings to required sizes (allow for internal brackets)
Support foot generally spaced 700mm – 800mm depending on span (support foot is not needed at wall, so the first and last feet should be approx 750mm from wall)
Bottom rail sits over support foot, with the R18 facing outwards
Self tap screw (STS) to hold bottom rail onto foot (from sides)
Framework as required to balance (hold panels with cable ties)
Place all panels into opening (look for modified end panels to on ends)
Shuffle panels to reduce gaps between. Usually 10mm gap at each end
STS through feet to secure into bottom rail
Cut adapter railing 20mm short (at each end) and place onto top lugs of panels. Pre drill and fasten with STS.
Slide on end brackets and lower federation handrail neatly over adapter rail.
Secure end bracket to wall with dynabolt, plugs and screws etc or best possible fastener for your particular project.
Secure adapter rail to handrail by pre drilling from underneath and using STS (usually 8G x 25mm stainless steel self tap)
Eliminate rattle/movement of handrail in brackets by using pop rivet or STS to fasten bracket and handrail together.
Secure brace as high as possible on balustrade and back onto floor (top fixing should be bolt + nylock nut). Floor fixing is best into joist or fixed with a plate below decking.
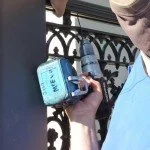
The following photos show an installation being done by a qualified builder.